Tuesday 7 February 2012

Customizing look & feel of OBIEE 11g dashboard

In this article you will see how to customize the look and feel of the OBIEE 11g dashboard page depending on the user login.

Firstly, you need to create a table with 3 columns - users, skin, style. Now to take care of the user based skin and style we need to define the session variables called SKIN and STYLE in the RPD file. Create an initialization block with these two variables as targets.


So based on your user, the Skin and Style variables will be populated from the table. Assuming in the table you have "LG" as user and Skin and Style have "LG" values as well.

After this we create two folder same as s_blafp and sk_blafp created under the directory -
<BI11g_install>/user_projects/domains/bifoundation_domain/servers/bi_server1/tmp/_WL_user/analytics_11.1.1/7dezjl/war/res

and name as s_LG and sk_LG. (taking the same example as mentioned above). These two folders exists under the same directory mentioned above. You will need to restart the presentation services once for the changes to take effect.

We will now modify couple of files within the sk_LG folder in order to show different look & feel on the dashboard.

1) To change the Oracle logo - you need to replace ../sk_LG/b_mozilla_4/oracle_logo.png to the new png file which contains customer logo. The size of the new png should be 119*25 pixels.

2) To change the banner : you need to replace /sk_LG/b_mozilla_4/branding_whitegradient.png with the new color banner. Remember to keep the dimensions same as old one.

3) To change the header bar separator line - In the ../sk_LG/b_mozilla_4/common.css you need to modify the HeaderBarSeparator class to reflect the new color code.

Similarly you can modify the tabs colors,background color of the dashboard page etc.

Remember to restart the Presentation services after making all the changes to skin and style folders. Now when any user logs in he can his is customized look and feel dashboard.


Wednesday 12 October 2011

OBIEE11g integration with WebCenter Framework Part2

Now that you have the portal application configured as mentioned here, we'll see how the end user can add contents run-time.

Once the application is run, it gets deployed on weblogic server and a URL is generated.  Execute this URL from a browser. After login you will see an Edit icon. Click on edit icon to add BI objects runtime.


Select Mash up. You will see oracle BI listed.


Here you will see the list of BI Connections that you mentioned in your JDev project.


Select the connection name. Now you can browse the BI Catalog.


The list of reports would be listed.


You an select and add a particular report.


You can also modify the properties of the report. Like if there are certain filters/parameters to be passed, modifying the report size etc.


Click Apply and then okay to view the report on the webcenter portal application.

Monday 10 October 2011

OBIEE11g integration with WebCenter Framework Part1


With the latest release of OBIEE 11.1.1.5, it can now have tight integration with WebCenter Framework and WebCenter Space. This means we can embed BI Objects from the presentation catalog (viz., analysis, dashboard, dashboard pages, scorecards) and embed into ADF page either runtime or design time. With this integration you get the following components-


1) Fusion BI View Object
2) Oracle BI Logical View Object
3) BI Composer
4) Runtime integration with webcenter

In this article I am going to focus on integrating OBIEE presentation catalog with Webcenter framework.

Requirments - In order to create Webcenter portal application, you must have JDeveloper 11.1.1.4/JDev PS3 or higher installed. For integration with presentation catalog you need to install OBI extensions. In the Jdeveloper go to Help->check for updates and select the BI extensions. You can also install these extension from local files. These extensions should be installed in the below given order and don't forget to restart the jdev after each install.

- bi-soap-cn_bundle
- bi-vo_bundle
- bi-adf_bundle
- bi-adf-taskflow-extension_bundle (required for webcenter)
- bi-jbips_bundle.zip (required for BI Composer)

Once the extensions are installed you can verify by clicking on JDev Help->About -> Extension tab.


Creating a WebCenter Portal Application -

Now we create a new Webcenter Portal Application. Once the application is created expand the Web tier and create a new JSF page. Remember to check the Create an XML Document (*.jspx) on the wizard.


Once the jspx page is created, select 'Oracle Composer'  under "Component Palette". You need to select "change mode link" and drop it after <af:form>. Then drag and drop "Page Customizable" on the same page after "change mode link".


Run the page and check if you can drop component onto page run time.


Defining BI Presentation Services Connection in Application Resources -


During design time in your JDev  you need to define the connection to presentation catalog. This will fetch the list of analysis and dashboards stored in the presentation catalog. Follow the below steps to define a new connection -

1) right click on connections under the application resource palette
2) select 'BI Presentation services..'.
3) A wizard opens and enter a connection name
4) Click next and enter BI Presentation Services location
5) specify the protocol (usually http ),Host and Port. Don't disturb the other entries unless your install is different
6) Provide with username and password usually given for BIImpersonateUser
7) Test the connection. A message like 'Connection established successfully' appears on the message box.

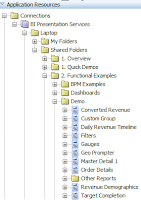
Under the Connection node of the application resource you'll now see your connection listed. On expanding the node you can browse the presentation catalog. You will find folders like My Folder and Shared Folder and can further go down to see a particular analysis.


Configuring the Application to display BI Presentation Catalog


You need to modify a couple of XML files in your application. This steps allows to add the BI Presentation catalog to webcenter portal application folder list. At runtime, the catalog displays in the webcenter resource catalog and the end user can browse to BI objects and add them onto the portal application page.


1) Locate weblogic.xml and add the below entry
  <library-ref>
    <library-name>oracle.bi.adf.view.slib</library-name>
  </library-ref>
  <library-ref>
    <library-name>oracle.bi.adf.webcenter.slib</library-name>
  </library-ref>


2) Locate weblogic-application.xml and add the below entry
   <library-ref>
     <library-name>oracle.bi.adf.model.slib</library-name>
   </library-ref>


3) Locate web.xml and add the below entry
    <servlet>
        <servlet-name>biregionservlet</servlet-name>
        <servlet-class>oracle.bi.presentation.servlet.BIRegionServlet</servlet-class>
        <load-on-startup>1</load-on-startup>
    </servlet>

    <servlet-mapping>
        <servlet-name>biregionservlet</servlet-name>
           <url-pattern>/BIProxy/*</url-pattern>
         </servlet-mapping>


4) Locate default-catalog.xml file and add the below entry
    <customContent id="oracleBIContent"                                              
       contentProviderClass="oracle.bi.presentation.rescat.BICatalogContentProvider"/>

Save the application.


Enable bi-adf taskflow permission in your application security setting -


1) Locate jazn-data.xml file and add the below entry -

              <permission>
                <class>oracle.adf.controller.security.TaskFlowPermission</class>
                <name>/WEB-INF/oracle/bi/adf/apps/answers/flow/BICatalogTF.xml#BICatalogTF</name>
                <actions>customize,grant,personalize,view</actions>
              </permission>
              <permission>
                <class>oracle.adf.controller.security.TaskFlowPermission</class>
                <name>/WEB-INF/oracle/bi/adf/apps/answers/flow/BIReportViewerTF.xml#BIReportViewerTF</name>
                <actions>customize,grant,personalize,view</actions>
              </permission>
              <permission>
                <class>oracle.adf.controller.security.TaskFlowPermission</class>
                <name>/WEB-INF/oracle/bi/adf/apps/answers/flow/BIReportWizardTF.xml#BIReportWizardTF</name>
                <actions>customize,grant,personalize,view</actions>
              </permission>
              <permission>
                <class>oracle.adf.controller.security.TaskFlowPermission</class>
                <name>/WEB-INF/oracle/bi/adf/apps/answers/webcenter/flow/BIWebCenterTF.xml#BIWebCenterTF</name>
                <actions>customize,grant,personalize,view</actions>
              </permission>
              <permission>
         <class>oracle.adf.controller.security.TaskFlowPermission</class>
                <name>/WEB-INF/oracle/bi/presentation/taskflow/task-flow-definition.xml#task-flow-definition</name>
                <actions>customize,personalize,view</actions>
               </permission>


Application is ready to run now. Save and run.

Watch out for Part 2 to see how user can add BI objects during run time.