With the latest release of OBIEE 11.1.1.5, it can now have tight integration with WebCenter Framework and WebCenter Space. This means we can embed BI Objects from the presentation catalog (viz., analysis, dashboard, dashboard pages, scorecards) and embed into ADF page either runtime or design time. With this integration you get the following components-
1) Fusion BI View Object
2) Oracle BI Logical View Object
3) BI Composer
4) Runtime integration with webcenter
In this article I am going to focus on integrating OBIEE presentation catalog with Webcenter framework.
Requirments - In order to create Webcenter portal application, you must have JDeveloper 11.1.1.4/JDev PS3 or higher installed. For integration with presentation catalog you need to install OBI extensions. In the Jdeveloper go to Help->check for updates and select the BI extensions. You can also install these extension from local files. These extensions should be installed in the below given order and don't forget to restart the jdev after each install.
- bi-soap-cn_bundle
- bi-vo_bundle
- bi-adf_bundle
- bi-adf-taskflow-extension_bundle (required for webcenter)
- bi-jbips_bundle.zip (required for BI Composer)
- bi-vo_bundle
- bi-adf_bundle
- bi-adf-taskflow-extension_bundle (required for webcenter)
- bi-jbips_bundle.zip (required for BI Composer)
Once the extensions are installed you can verify by clicking on JDev Help->About -> Extension tab.

Creating a WebCenter Portal Application -
Now we create a new Webcenter Portal Application. Once the application is created expand the Web tier and create a new JSF page. Remember to check the Create an XML Document (*.jspx) on the wizard.

Run the page and check if you can drop component onto page run time.
Defining BI Presentation Services Connection in Application Resources -
 During design time in your JDev you need to define the connection to presentation catalog. This will fetch the list of analysis and dashboards stored in the presentation catalog. Follow the below steps to define a new connection -
1) right click on connections under the application resource palette
2) select 'BI Presentation services..'.
3) A wizard opens and enter a connection name
4) Click next and enter BI Presentation Services location
5) specify the protocol (usually http ),Host and Port. Don't disturb the other entries unless your install is different
6) Provide with username and password usually given for BIImpersonateUser
7) Test the connection. A message like 'Connection established successfully' appears on the message box.
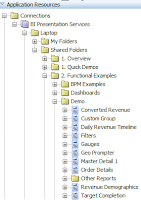
Under the Connection node of the application resource you'll now see your connection listed. On expanding the node you can browse the presentation catalog. You will find folders like My Folder and Shared Folder and can further go down to see a particular analysis.
Configuring the Application to display BI Presentation Catalog
You need to modify a couple of XML files in your application. This steps allows to add the BI Presentation catalog to webcenter portal application folder list. At runtime, the catalog displays in the webcenter resource catalog and the end user can browse to BI objects and add them onto the portal application page.
1) Locate weblogic.xml and add the below entry
<library-ref>
<library-name>oracle.bi.adf.view.slib</library-name>
</library-ref>
<library-ref>
<library-name>oracle.bi.adf.webcenter.slib</library-name>
</library-ref>
2) Locate weblogic-application.xml and add the below entry
<library-ref>
<library-name>oracle.bi.adf.model.slib</library-name>
</library-ref>
3) Locate web.xml and add the below entry
<servlet>
<servlet-name>biregionservlet</servlet-name>
<servlet-class>oracle.bi.presentation.servlet.BIRegionServlet</servlet-class>
<load-on-startup>1</load-on-startup>
</servlet>
<servlet-mapping>
<servlet-name>biregionservlet</servlet-name>
<url-pattern>/BIProxy/*</url-pattern>
</servlet-mapping>
4) Locate default-catalog.xml file and add the below entry
<customContent id="oracleBIContent"
contentProviderClass="oracle.bi.presentation.rescat.BICatalogContentProvider"/>
Save the application.
Enable bi-adf taskflow permission in your application security setting -
1) Locate jazn-data.xml file and add the below entry -
<permission>
<class>oracle.adf.controller.security.TaskFlowPermission</class>
<name>/WEB-INF/oracle/bi/adf/apps/answers/flow/BICatalogTF.xml#BICatalogTF</name>
<actions>customize,grant,personalize,view</actions>
</permission>
<permission>
<class>oracle.adf.controller.security.TaskFlowPermission</class>
<name>/WEB-INF/oracle/bi/adf/apps/answers/flow/BIReportViewerTF.xml#BIReportViewerTF</name>
<actions>customize,grant,personalize,view</actions>
</permission>
<permission>
<class>oracle.adf.controller.security.TaskFlowPermission</class>
<name>/WEB-INF/oracle/bi/adf/apps/answers/flow/BIReportWizardTF.xml#BIReportWizardTF</name>
<actions>customize,grant,personalize,view</actions>
</permission>
<permission>
<class>oracle.adf.controller.security.TaskFlowPermission</class>
<name>/WEB-INF/oracle/bi/adf/apps/answers/webcenter/flow/BIWebCenterTF.xml#BIWebCenterTF</name>
<actions>customize,grant,personalize,view</actions>
</permission>
<permission>
<class>oracle.adf.controller.security.TaskFlowPermission</class>
<name>/WEB-INF/oracle/bi/presentation/taskflow/task-flow-definition.xml#task-flow-definition</name>
<actions>customize,personalize,view</actions>
</permission>
Application is ready to run now. Save and run.
Watch out for Part 2 to see how user can add BI objects during run time.
HI man! great post, I'm trying to do my connection with impersonator user but when I get loggin into webcenter BI connection trying to request with user's credential logged in webcenter, do you know what happen?? tanks
ReplyDeleteAldoshin, it should work if you are successfully able to test the BI connection in your project. Otherwise, can you make this user (defined in your application) as Administrator user and then test the integration.
ReplyDeletehi Ruchi...thanks for this post.But i have some queries.what is the difference between Oracle composer and BI Composer? And do we need to configure the BI Composer with OBIEE to use BI Composer on portal to integrate it with OBI? And one more thing...i have followed the procedure you explained above...i am able to see the catalog(My Folder & Shared folder in Resource connection) and that EDIT icon on the JSF page but that button is not active or u can say not working. Please help me out from this issue...thanks.
ReplyDeleteHi! I want to display the OBIEE dashboard on a jspx page. I want to insert it during design time itself. But I am unable to drag and drop a component onto the page inside element. Can u please help me with this.
ReplyDeleteHi,Combined with other factors, a website with well-categorized content easily and quickly can obtain a high level of usability in Web Design Cochin, search engine ranking and user trust. Let’s look at the basic website structure.Thanks.........
ReplyDelete